Creating Relevant Content for SEO
You often hear that in order to be found online, you need to have good SEO (Search Engine Optimization). And in order to have good SEO, you have to have a lot of relevant content for your website. Well, how do you produce relevant content?
Answer Questions
A great way to start posting relevant blog posts is to answer everyday questions that your client asks you. Things that you now reflexively answer that seem so trivial to you are probably questions that your future clients have as well. If you answer them once for your own client, put it in writing and answer them for future clients.
Provide Added Value
I’ve seen a lot of companies offer lawyers “custom” website and “custom” phone apps. What I end up seeing is cookie-cutter websites and cookie-cutter apps that does nothing more than connect your client with a push-to-call button and a map. Apps and websites like that doesn’t provide any added value to your clients and doesn’t distinguish you from the rest of your competition.
For example, I have a divorce practice so I created a divorce calculator that allows litigants to quickly calculate alimony and child support. They can do it via my website or they can download an app to do it either on their iPhones or Android devices. This is useful because the courts do not provide a way for people to do this on their phones and in the courthouse. The courts only provide a downloadable PDF which is not useful if you don’t have your computer with you or have internet access when you’re in court. This is an added value because I’m providing something that is not available before.
If you’re able to do those two things – answer every day questions and provide some added value to your customers, you are well on your way to being found and being hired for your expertise.
Tech Review – TrialPad 2.1 for iPad
I love the iPad and I am starting to know more and more trial attorneys that love their iPads as well. One of the most useful tools to a trial attorney when it comes to conducting trials are their Trial Binders and the ability to use Audio/Visual to capture the jury or judge’s attention. Many courts, including the Federal Courts, are starting to provide hook-ups in the courtroom for laptops so that attorneys can use tools such as powerpoint in their trials. For the iPad lawyer who conducts trials, there is no more useful app than TrialPad.
TrialPad acts as your trial binder, laptop and powerpoint presentation, all wrapped up in one. The visual aspect of the app makes it very intuitive to use. Basically you make folders of your cases that are going to trial and you put your exhibits inside the folders. TrialPad is also fully integrated with Dropbox which makes the ease of transferring your trial binder documents into TrialPad that much easier.
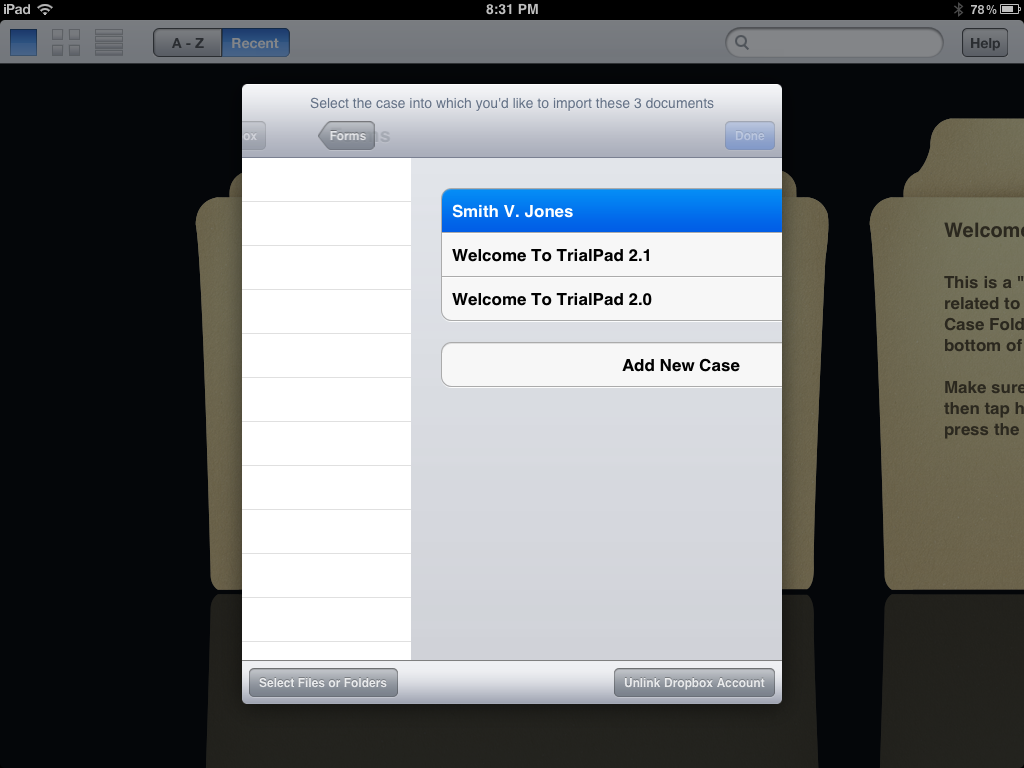
As you can see from the picture below, I’ve selected some documents (just from my forms folder on my dropbox so I’m not showing you real client files) that I can select and port into the folder I’ve created. In real life use, I would probably not port all the files all at once, but just like making a trial binder, you should be doing it as the litigation progresses so by the time trial comes around, you have a full trial binder and minimal work is required to jazz it up.
After selecting the files, it then gives me the option to put it into folders. TrialPad lets you have multiple cases at the same time. What you see below is the case I created just for this review called Smith v. Jones. The other two folders you see are the instructions that come with the app.
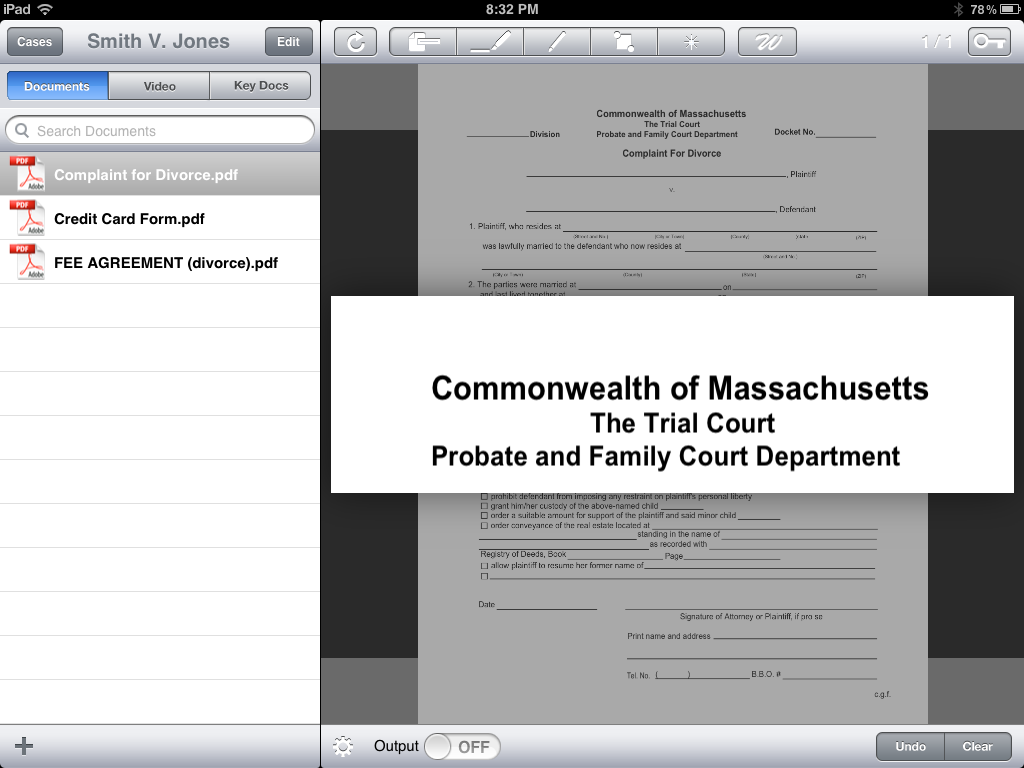
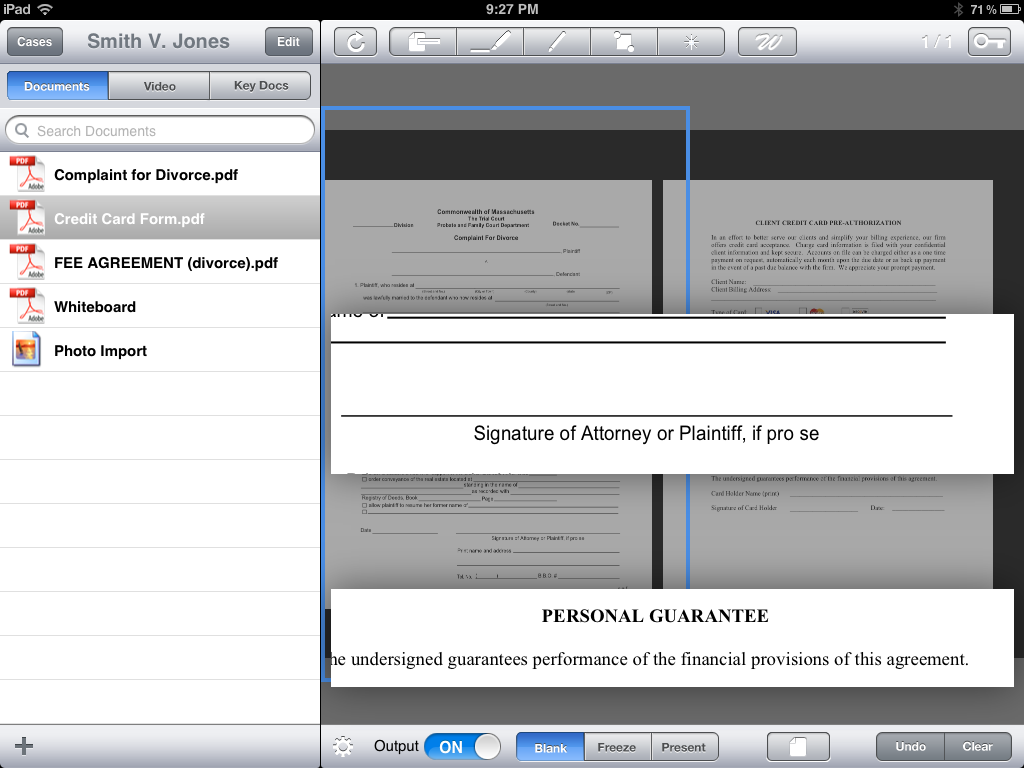
Once I get the files ported into the correct client folder, I can start to manipulate it as if I was at trial. If I had this hooked up to a projector in the courtroom, you can see that it has one of the most important function for documents in a trial attorney’s arsenal – the call out. TrialPad lets me easily select a line or block of text and the program automatically does the animation to pull it out and draws attention to it. This used to be a multi-step process when done in powerpoint but now, it’s simply a touch and drag option.
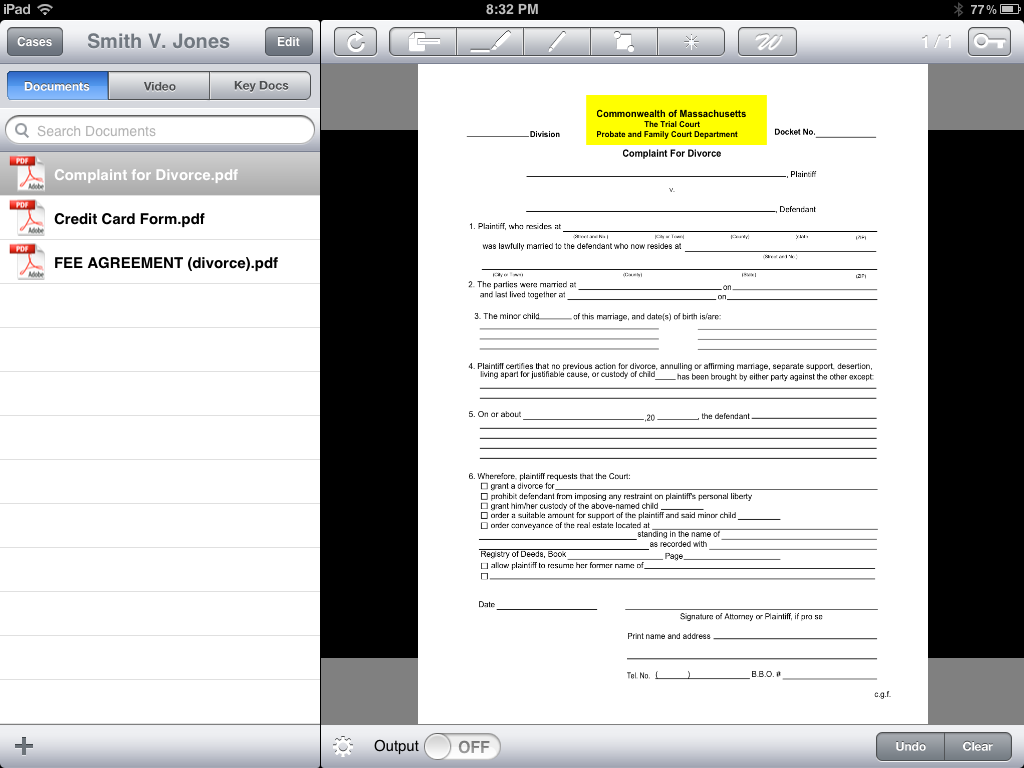
Similarly, the highlight function is useful to highlight selected text. You can combine the highlight and then call-out function to really draw the audience’s attention to the selected text. In the past, all this animation had to be pre-planned and done in advance on powerpoint. TrialPad’s intuitive touch and drag makes the process more organic and fluid and you can adopt your presentation depending on the situation. For example, if you’re questioning a witness and they reference something in a document, you can quickly go to it in your folder, highlight it and call it out. There’s no need to pre-plan.
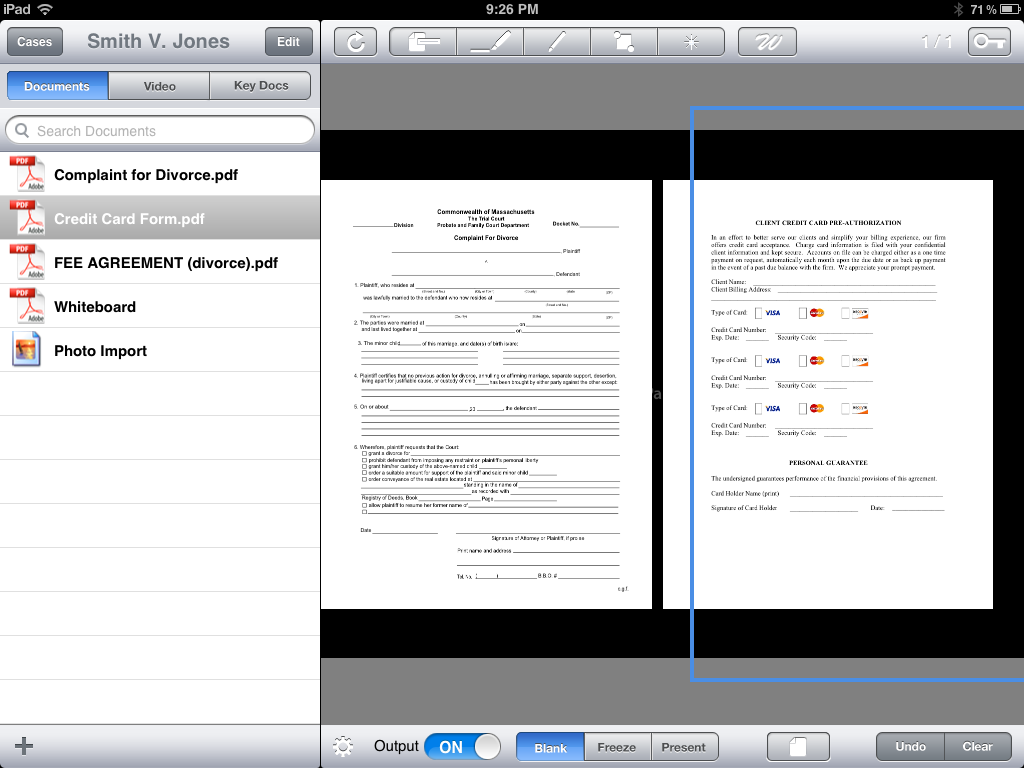
TrialPad also let’s you display 2 documents, side by side, to aid in comparison demonstration.
While in dual document mode, you can use any of the annotation tools such as call-out or highlight on both documents. This can be extremely useful if for example, you want to present evidence of forgery by comparing signatures side by side.
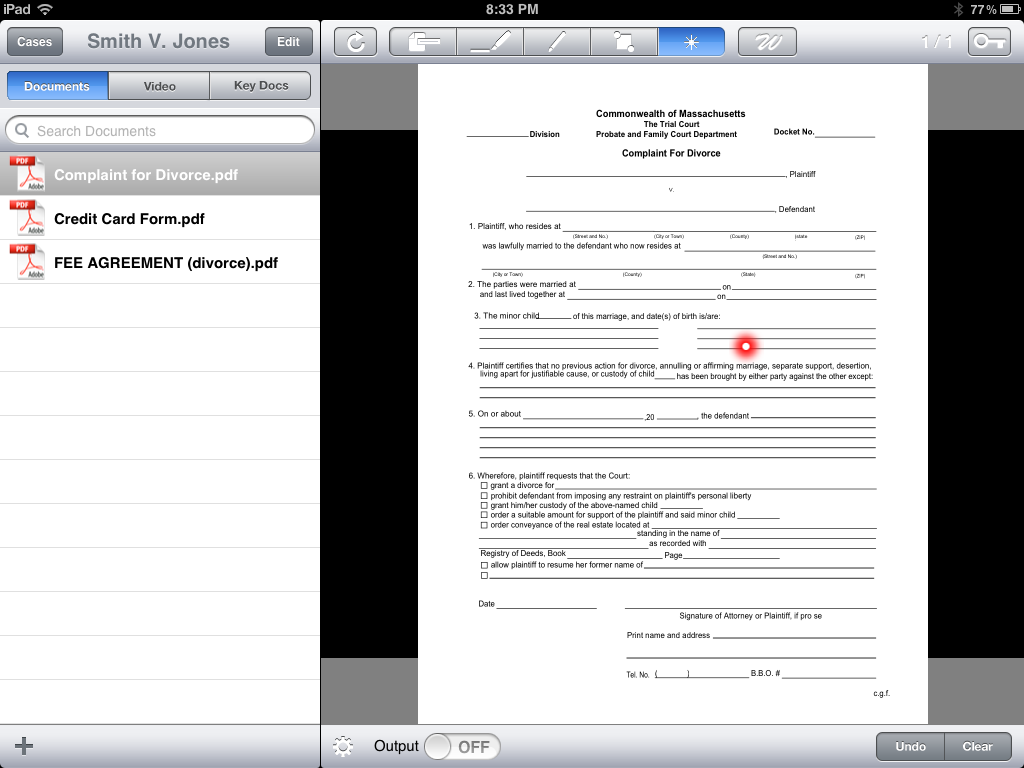
Another often used function is the pointer option. We used to have to carry around a laser pointer and while navigating a presentation, use it to point to things on a screen. Now that pointer is built in to the app itself.
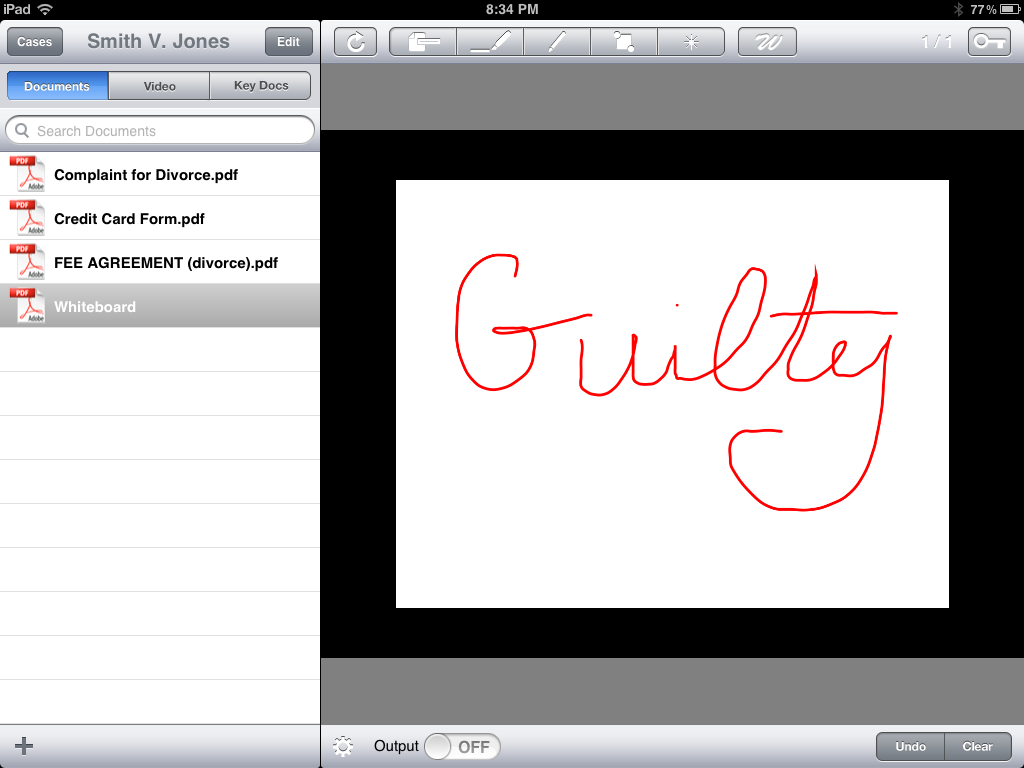
If you’re ever in a trial and instead of referencing a document, you need to explain a complicated idea to a jury or judge, there is also a whiteboard feature in TrialPad. It lets you easily create chalks for trial.
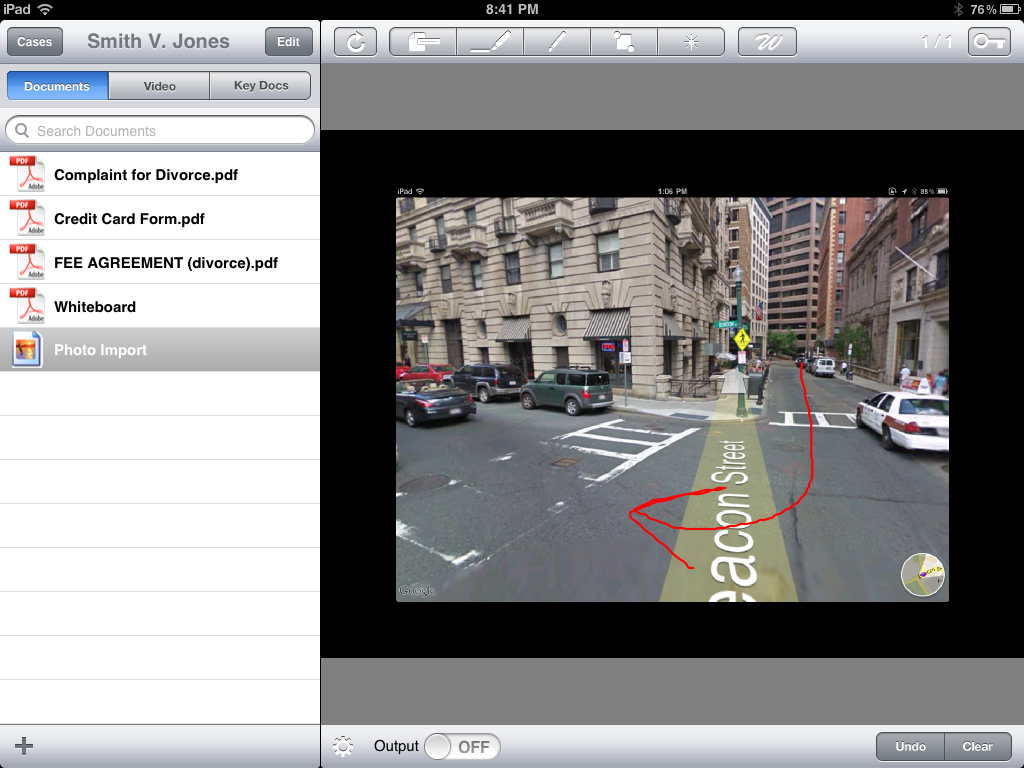
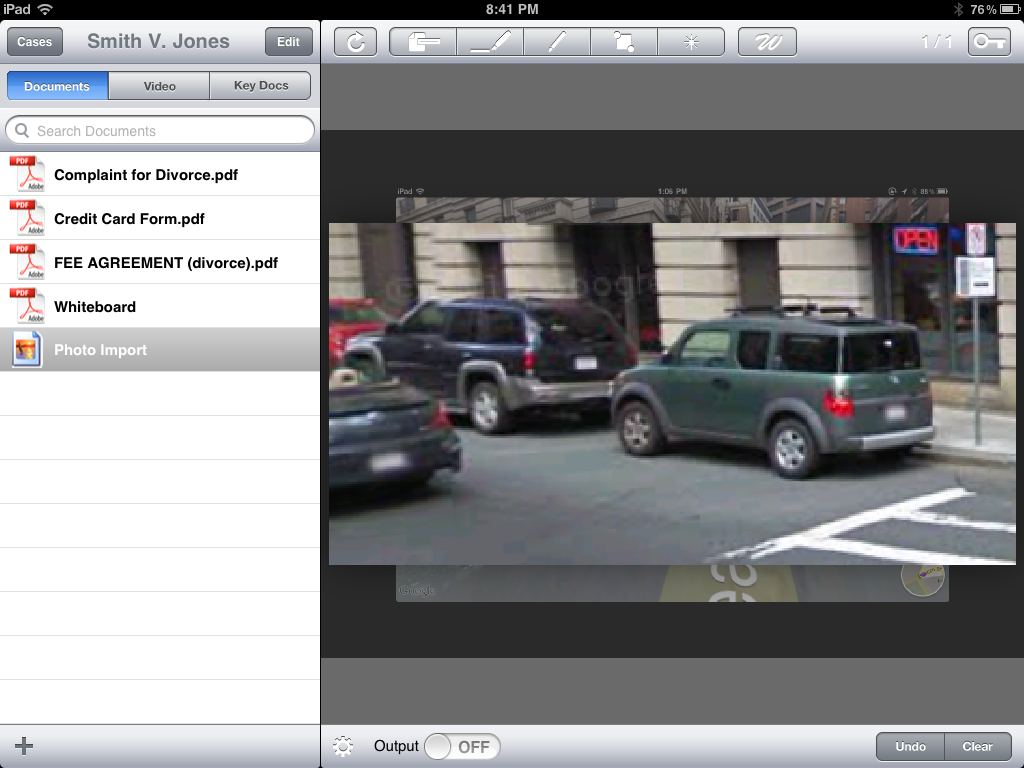
In addition to documents, TrialPad also supports photos and video. This is especially useful as you can see below. You can quickly and easily use Google Maps to pull the jury’s attention to the exact spot where an auto accident occurred and then illustrate what the witness on the stand is saying by drawing on the photo itself. This is dynamic, reactive and in real-time for everyone to see in the courtroom.
The call-out function also works for pictures if you want to direct the jury’s attention to a specific detail in a photo. For this, I would recommend a very high resolution photo.
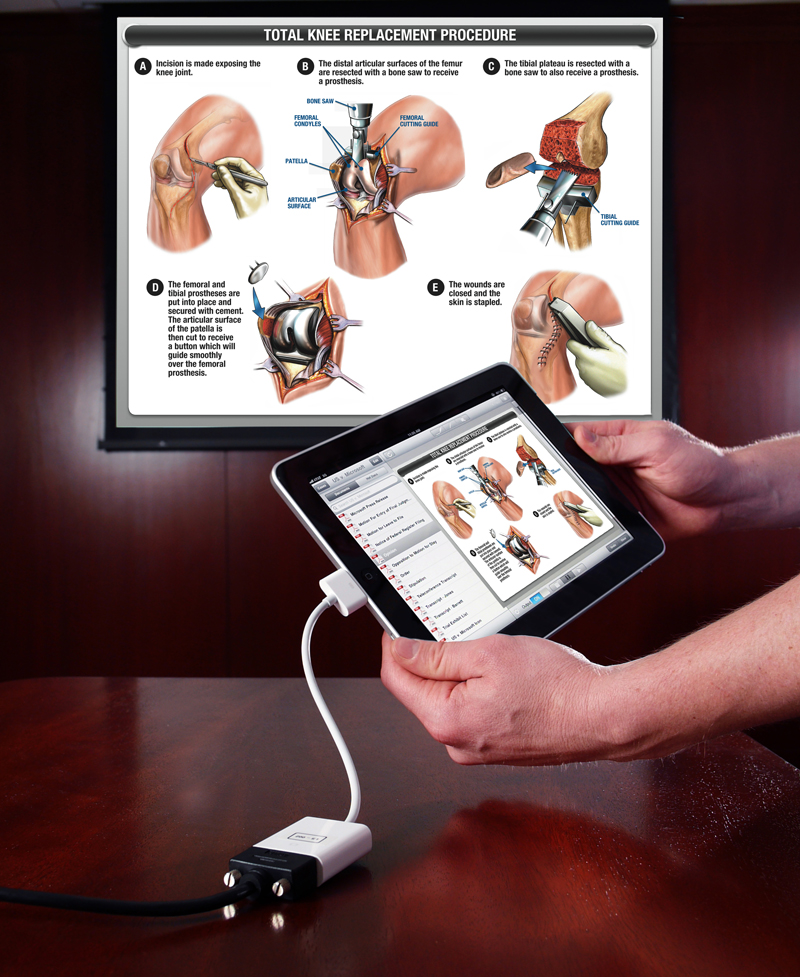
Lastly, you will notice that on the bottom of all the slides above, there is a button or slider that’s labeled “Output”. What this does is control what the audience sees and it’s not necessarily what you see on your iPad. This basically replaces the old cardboard or notepad placed in front of the projector trick. As you can see from the picture below, with the output turned on, the audience only sees the graphics part (or the right panel) of your screen, not the entire contents of what you see and functions on your iPad.
A very useful resource I’ve found in trying to figure out all the options of TrialPad or any other app is to search for it on Youtube. There are many video reviews for apps which provides a good how-to on all the features of an app.
Have fun with TrialPad!
Going Paperless (Out of the Office)
If you’ve successfully gone paperless in the office and you want to take the next step, then you’re looking at going paperless outside of the office as well. What do I mean by this? For example, in my practice, divorce litigation, I need to meet with clients. During those initial client meetings, I would fill in basic divorce forms, financial statements and take notes as to what the client wants accomplished. The same initial consultation process goes for a variety of practice areas. Well, in the old days, what I would do is print out the forms I need filled out and jot notes down on a yellow pad. After the meeting, I would go back to my office, and essentially transcribe what I just wrote down, into the pdf forms on my computer. And then what did I do with the paper I printed out for the client meeting? I threw it out. Now that’s a waste of paper isn’t it?
The solution is Apple’s magical iPad (or iPad2 if you can splurge).
 We all know what the iPad is and most of us use it for checking mail, surfing the web, calendaring and Angry Birds. There is so much more that it can do because of its wonderful app store. Here’s a few apps that will entirely change the way you conduct client meetings and also take your paperless office out in the real world.
Dropbox (free up to 2GB storage)
Dropbox is an app that essentially lets you sync any file from any device to any device. Once you download dropbox on your computer, drag and drop any folder you want to share and keep synced. Then you can download the app on your iPad or iPhone and the files will be synced to that device.
Note Taker HD ($4.99)
Note Taker HD is a notepad on steroids. This will essentially replace your old yellow legal pad. It lets you create multiple note folders, multi-page, and most importantly, it has the ability to shrink your handwriting down to a readable type that saves space on the iPad screen. Check out some tutorials online to see how to fully utilize it.
SignMyPad ($3.99)
SignMyPad transforms your iPad into a, well, pad, that people can sign. Duh! You can load pdf forms into the app and you can enter in text or have clients sign legal documents. You can then use dropbox to transfer the documents back to your office.
Square (free)
I’ve talked about taking credit cards in the past and I’ve mentioned Square. This app and little device lets you take credit card payments from clients and it can email them receipts immediately. Clients can also sign for the receipt right on your iPad or iPhone, cutting out the need for a printed receipt – paperless.
Chase (free)
Chase might not be your bank of choice but their app is phenomenal. Their app uses your iPad or iPhone’s camera, so that you can take a picture, front and back, of a check, and make an instant deposit. No more making trips to the bank to deposit client checks.
Now that you have the essential apps, let’s bring it all together to see how we can use them to bring the paperless office OUT of the office. Let’s use the situation that I exampled above with my client. Before, I had to use all that paper only to end up throwing it out. Now, I use my Dropbox to sync all the forms I need for my client meeting into SignMyPad. I use SignMyPad to fill in all the forms and even have the client sign my fee agreement on the iPad itself, which I can immediately email them a copy. When it comes time to take notes of what my client wants, I start my Note Taker HD app and just start writing. Then at the end of the meeting, if my client wants to pay me by credit card, I use Square to process it. If my client pays by check, I take a picture with my iPad or iPhone and deposit it right away through the Chase app.
Fastcase (free)
Fastcase is not free if you’re using it in the office, but their app is free for the iPhone and iPad. Nothing beats free caselaw research.
Keynote ($9.99)
Apple’s version of PowerPoint. It’s less robust but the ease of use and graphical interface is fantastic.
TrialPad ($89.99)
This is the ultimate trial preparation and presentation app. It combines the features of keynote with a robust filing interface to make organizing and presenting a trial binder more effective in court.
Another way to use the iPad is in court. Using Dropbox, you can always have all your client’s documents and pleadings with you at all times. If opposing counsel cites a case or statute you don’t know, you can instantly look it up using the free Fastcase app. If you are a trial attorney, you can build creative and persuasive presentations to supplement your oral arguments using Keynote (or TrialPad if you can splurge.) Juries only remember 10% of what you say to them. But studies show that when combined with visual aid, juries’ memory of the case and key points increase several folds.
Many of these tips, I learned at the annual ABA Techshow. If you have time, it is definitely worth the trip to Chicago.
Going Paperless (in the office)
One of the best things I ever did for my law practice was go paperless. One of the best pieces of equipment/technology I bought for my office was a Fujitsu ScanSnap scanner (in fact, I have 3 of them). So what does it mean to go paperless? What it doesn’t mean is that your office will be devoid of paper. Right now, that is simply not realistic. For example, I practice divorce litigation in the Massachusetts Probate Courts and since the court system is not paperless, I must file pleadings by paper. Also, if you’re an estate planning attorney, you will have occasion to keep original Wills and Trusts. The idea is to use LESS paper and not entirely paperLESS.
The first step in going paperless is getting the basic technology. It is a costly investment at first, but you will get your money’s worth by having increased productivity and a clean office. First, decide what kind of scanner your office needs. If you’re a solo or a very small firm, you should invest in the Fujitsu ScanSnap S1500 that I mentioned above. You can either get one ScanSnap and put it in a central location where everyone can use it, or splurge and get one for everyone (I prefer the latter for my office). If you have a larger law office or if you do large amounts of transactional work, you might want to invest in a commercial bulk scanner.
 The good thing about the ScanSnap is that it also comes with Adobe Acrobat Standard edition. The software itself is worth buying the scanner in my opinion. If you happen to buy a scanner that’s not the Fujitsu, then you will want to go buy Adobe Acrobat. If you want to splurge, I would upgrade to the PRO version. In my opinion, all attorneys should have and learn to use Adobe Acrobat regardless of whether or not you’re going paperless.
*Tip: Do not buy a flat bed scanner to use exclusively for paperless office. Top feeders like the ScanSnap scans much faster and will cause you less heartache in the long run.
Once you have a scanner and Adobe Acrobat, it’s time to start scanning. What do you need to scan? Everything!
The challenge at this point, is knowing how to organize and find files. I would suggest the following naming convention:
<year>_<2-digit month>_<2-digit day> <Correspondence type> to/frm <Party name> re <subject matter>
So for example, if I was receiving a letter from opposing counsel regarding a settlement agreement, I would name it as such:
2011_04_17 Ltr frm OC re Separation Agreement.pdf
The way this will look on your computer is that everything will be ordered chronologically and just by looking at the file name, you’ll be able to know what the file is about without to open it up. It makes for searching through a client’s file, extremely simple.
You should also institute an office policy that every single piece of paper that comes into the office, must be scanned first, no exceptions. And every single piece of paper that goes out, should also be scanned.
*Tip: Don’t let the enormity of scanning all your old files keep you from going paperless today. Start going paperless now and move forward. You can always hire an intern to scan old cases. This will make the transition less a herculean effort.
If you remember to do this and keep the naming convention consistent and keep at it, sooner rather than later, you will be running a LESSpaper office and clutter and the need for big filing cabinets will be a thing of the past.
Monitoring Your Online Reputation
As a lawyer, your reputation in the community among your peer and clients is everything. If you’re a great lawyer, fellow attorneys and old clients will refer you business because they know of your good work. If you’re a lawyer that cheats people out of money – sure you could probably pull it off for a little while, but sooner than later, it will catch up with you and people will know that you have a reputation as a bad attorney.
It is because our reputation is tantamount to our success, that we need to be cognizant of what that reputation is. What does the community think about us? What does our client think about us? Due to the internet, it is commonplace for clients to rate services from restaurants to plumbers to lawyers. They have a myriad of places they can do this – either to say how great you are or how much you suck. They have services like Yelp, Avvo and Google Places, just to name a few.
The best way to monitor what people are saying about you online, is to simply set up Google Alerts. Google Alerts is a feature that does a continuous search of the internet to find key terms that you tell it to look for and either places it in your RSS Reader or emails you when it finds something new. Here’s how to set it up:
First, go to google/alerts and you’ll find this
 Enter in the search terms you want to search for and create an alert either by email or RSS feed. Repeat this process for multiple search terms. This is what my Google Alert looks like. Notice that I do a search for my name, law firm name and all of my website just in case someone links to any one of my sites, I know instantly.
Accepting Credit Cards for iPhone or Androids
I’ve written about accepting credit cards for law firms in the past (here and here), but with the release of the Verizon iPhone, I’m finally able to get an iPhone of my own and I’m ditching my blackberry for something a bit more powerful. One of the first things I’m going to try is accepting credit card payments with my iPhone.
 There are quite a few competitors out there for on-site smartphone credit card readers but I’ll just mention the leading contenders. First up and the one that I will try will be Square (pictured right). It’s founded by the one of the guys from twitter and in my opinion is the simplest to use and smallest to carry around. Another leading provider is Mophie (pictured center) who has partnered up with Intuit to bring us a sleek credit card reader that fits over the whole iPhone. It looks more stable than Square but unless we’re swiping credit cards continuously during the day, I don’t really see a need to have a permanent attachment to my iPhone. The last one I’ll mention is Payware (pictured left). I would not recommend this device for lawyers because of the sheer bulk of the machine and the overload of unnecessary tools that lawyers will never get to use (such as a bar code scanner).
Several things I should mention for attorneys thinking about using one of these machines is even though it’s very convenient, you must know the local rules on fees and how to collect them. In Massachusetts, you cannot use any of these machines to take a retainer. If however, you’re like me and take only flat fees, then these machines can be used. If you want to take a credit card for a retainer, then check out the previous posts I’ve linked to above on directions on how to do that.
Lastly, if you’re practicing bankruptcy, you cannot accept credit cards of any kind.
So you’re hanging a shingle – now what? (PODCAST)
I had the pleasure of talking with Attorney Kyle Guelcher on his new podcast show on the Legal Talk Network. His new show is called New Solo and he’s going to be interviewing guests that will be able to speak about being a new solo or giving advice to new solos and how to practice law.
http://legaltalknetwork.com/podcasts/new-solo/2011/01/new-lawyer-new-solo/
efax 101
When I started my law practice, I didn’t have the money or the sense to go paperless. Approximately 1 year later, I did just that because 1. I had enough money to buy a scanner and 2. I couldn’t afford not to.
One of the main things I did to go paperless was to throw away (actually it’s still in my garage collecting dust) my fax machine and replace it with an efax service. There were many to choose from and I looked at comparison sites such as faxcompare.com. I looked at the cost and how many pages I could receive and send each month and ease of doing so.
I was told by several people that they had trouble with one efax service or another so I also did a search online for reviews. Ultimately I chose myfax.com. I didn’t choose it because it was the cheapest (because it was not). Nor did I choose it because of its ease of use (although it is pretty easy to use). I chose it because it was the only service I could find that when I called their 800 number, there was a real, living, breathing human being on the other side to help me set up and answer my questions. I chose it for its customer service and I still don’t regret it.
Efaxing is easy on myfax. If I have a document I need to fax, I simply attach it as an attachment on an email and send it to the recipient’s phone number followed by @myfax.com. I can attach WORD documents, PDFs, JPGS, or anything else that I want to transmit. I can also attach more than one file if I want to send multiple documents or attach a cover letter separately from the rest of the document. I can also write in the body of the email as an alternative to sending a separate cover letter.
Receiving email is equally simple. I had a land-line where my fax number was located. I simply asked customer service at myfax to port my fax number over to their service and voila, it was done. It took approximately one week but one week later, I was up and running. Every time I would receive a fax, it would come into my email inbox as a pdf attachment. This was extremely convenient now that I was paperless because I would scan all my documents as pdfs anyways.
The advantage of using efax is really to save paper. I don’t have to print out a document simply to fax it. Nor do I have to receive a piece of paper if someone is faxing me something. If I want to print it, I will. If not necessary, I’ll just read it on my computer screen and save it in my folders.
Contrary to popular internet rhetoric, faxing is not dead. It’s been around since the 70s and people still use it. Ditching it altogether will not make you cool or trendy. It’ll just make it inconvenient for some people to send you stuff. Upgrade to efaxing so you can be conveniently reached and also trendy.
Ditch Pitney Bowes – Best Stamp Solution for a Small Law Office
Ditch that bulky and expensive Pitney Bowes machine. Not only do they charge you for the machine and stamps, they also charge you a monthly fee for the privilege of using their service.
Instead, go for the DYMO LabelWriter Twin Turbo system instead. You simply buy the machine and that’s it. There is no toner to buy, only the label rolls. It works on some futuristic thermal printing technology that doesn’t require toner. The stamp program that accompanies the machine is through Endicia. There is no cost for using the service, only the cost of stamps.
For a little bit extra, if you’re feeling the need to splurge, also buy the DYMO scale that connects via USB so you won’t have to manually input the weight of your letters or packages. The scale automatically weighs it and calculates the postage for you!
Law Office Burglarized (Lesson in Back-Up)
A close lawyer friend of mine was recently the victim of a burglary. Her law office was broken into over a weekend and the thieves stole all her computer equipment and other valuables. Even though she kept paper files, all her computerized files were gone along with her computer.
I asked her after she told me about the break-in, “Did you back up?” Her response is typical of lot of attorneys, “It was next on my list of things to do.” But we all know that that list only grows longer and other things start to creep in ahead of backing up.
She has since spent a lot of time and money to rebuild her office from this catastrophe. The lesson to be learned is that even though you may lose your computer to theft, fire or other disasters, if you have an effective back-up system, the only cost to you would be the money to replace the equipment. The time to restore your old files would be negligible.
I recommend multiple backups, one of which should remain outside of your office. Keep a hard drive backup and also an online backup such as Mozy or Carbonite. Do it now before it’s too late!


